Showing posts with label Linux. Show all posts

Generate random password on Linux terminal

Jan 21, 2017
This just a log for me (& may be others) to remind me how to generate random passwords on Linux terminal. pwgen is a useful command which can generate both pronounceable and secure passwords. There a few other creative ways to generate random text/password on linux terminal, but pwgen is specially designed for the task and is the most handy. The usage is quite simple:
pwgen [ OPTIONS ] [ pw_length ] [ num_pw ] By default, pwgen generates pronounceable passwords. For secure password use -s option. The pwgen man page describes more options. Here are some example outputs:

Generate 6 random (pronounceable) passwords of length 20. $ pwgen 20 6 fei7hohS9co6ahkua2ei chaiFoo2eaLedei9Oosi Ainuu5eehie5ae1eecae co6quahbaiPahSh1good fah6Daer7geepae0teef queeLahl9us7sushawie
Generate 6 random (secure) passwords of length 20. $ pwgen -s 20 6 PTbQ8Nc8gIJ5sHrKM0gS pMI8R8KK0MrnCd4UCEhe 25KcqpYiQTOFYf7PHwoN ztClxu7CQiOOVPgNJFHa yKnc1obXyXLvmPmLAVWA L1fMNHRRHiC2MNWS6j2Z
Generate 6 random passwords of length 20 with special characters. $ pwgen -y 20 6 EN5eb2eyuz2ohNgir}ei yah>l9ainohWah8afaiJ Jue-dah3quoo8wee9foh ul)eoWie3Ees;aeh(ees pheehie+Zanahw~eiP5g dath5oozaht0fei&F4Xi
Generate 6 random (secure) passwords of length 20 with special characters. $ pwgen -s -y 20 6 JSt]pL1UV)`u>Rz%;]Ei yx-sWF#pm_ci?(w|D0pd [#W%%E%oP7vQ~U%?#L<9 :~Y:Z?LH''aHH&A$zJ4w zZ5vZH+ABm!k;S_b^#cb c"zpT6l1HI_"ENSuNAkw
Lastly, here is the pwgen help text: $ pwgen --help Usage: pwgen [ OPTIONS ] [ pw_length ] [ num_pw ] Options supported by pwgen: -c or --capitalize Include at least one capital letter in the password -A or --no-capitalize Don't include capital letters in the password -n or --numerals Include at least one number in the password -0 or --no-numerals Don't include numbers in the password -y or --symbols Include at least one special symbol in the password -s or --secure Generate completely random passwords -B or --ambiguous Don't include ambiguous characters in the password -h or --help Print a help message -H or --sha1=path/to/file[#seed] Use sha1 hash of given file as a (not so) random generator -C Print the generated passwords in columns -1 Don't print the generated passwords in columns -v or --no-vowels Do not use any vowels so as to avoid accidental nasty words
Read more ...

TeamViewer initctl start fail on Linux

Sep 11, 2015
Tested on: Linux Mint 17.1 Rebecca (Ubuntu 14.04.1 LTS) with TeamViewer 10.0.46203

TeamViewer is great! But it keeps a daemon running in background, which may not be very desirable for occasional users. The daemon can be disabled by running: $ teamviewer daemon disable tee: /opt/teamviewer/logfiles/install_teamviewerd.log: Permission denied Fri Sep 11 14:12:42 PDT 2015 Action: Removing ... initctl stop teamviewerd initctl: Unknown instance: fail rm: cannot remove ‘/etc/init/teamviewerd.conf’: Permission denied initctl: Rejected send message, 1 matched rules; type="method_call", sender=":1.113" (uid=1000 pid=22111 comm="initctl reload-configuration ") interface="com.ubuntu.Upstart0_6" member="ReloadConfiguration" error name="(unset)" requested_reply="0" destination="com.ubuntu.Upstart" (uid=0 pid=1 comm="/sbin/init") OK, using sudo seems to do the trick: $ sudo teamviewer daemon disable Fri Sep 11 14:14:55 PDT 2015 Action: Removing ... initctl stop teamviewerd initctl: Unknown instance: fail wine: /home/username/.config/teamviewer10 is not owned by you
After disabling daemon, TeamViewer shows following error message when started, which is expected. However, the daemon fails to start when the command is executed:

$ sudo teamviewer daemon start initctl start teamviewerd initctl: Unknown job: teamviewerd fail $ sudo teamviewer --daemon start initctl start teamviewerd initctl: Unknown job: teamviewerd fail initctl is not aware of teamviewerd, probably because /etc/init/teamviewerd.conf was deleted during the daemon disable command (see above). Reinstalling teamviewer makes it work, but that's not the best solution.

After looking into some more details, following command can be used to start the daemon (open TeamViewer as usual after this and Ctrl-C to kill the daemon): $ sudo /opt/teamviewer/tv_bin/teamviewerd -f
For reference, initial content of /etc/init/teamviewerd.conf can be found in /opt/teamviewer/tv_bin/script/teamviewerd.DEB.conf, which can also be modified and copied to correct location. Also see this Github discussion and this blog post for more details.
Read more ...

tikz.sty not found

May 12, 2015
Tested on: Linux Mint 17.1 Rebecca (Ubuntu 14.04 LTS - Trusty Tahr)

This error with pdflatex has been mystery to me for a long time. Surprisingly, it is not easy to find a clear solution online.
ERROR: LaTeX Error: File `tikz.sty' not found. --- TeX said --- Type X to quit or <RETURN> to proceed, or enter new name. (Default extension: sty)

Solution

sudo apt-get install texlive-pictures pgf
Installation of the package pgf is the most important bit! Without pgf LaTeX will keep complaining that tikz.sty is missing. This solution was also proposed in a comment on stackexchange:

... The pgf package, as I keep forgetting and remembering every year, is independently installed from the pictures (which includes tikz but it's not loaded unless pgf is present) extras, the common, and the main tex on 'ix systems.


Read more ...

Connecting to USC Secure Wireless on Linux

Dec 23, 2014
Tested on: Ubuntu 14.04, Linux Mint 17, Linux Mint 17.1

USC (Univ. of Southern California) updated its wireless service to have an encrypted and faster connection available to USC faculty, staff, and students with name 'USC Secure Wireless'. Unfortunately for students like me, USC did not document how to use Linux computers with this service.

Following configuration has worked for me to connect to USC Secure Wireless during past couple of months. The basic idea is to use 'WAP2' or 'WAP Enterprise' security and use Protected EAP (PEAP) authentication along with GTC as secondary authentication. Same idea works on Android phones as well.

Create a new connection by right-clicking on 'Network connection' icon in notification area and choosing 'Edit Connections...' It will pop a 'Network connection' window. Click on the 'Add' button on the right side and choose 'Wi-Fi' as connection type. Then follow the settings described in the images below (click on the images to enlarge them). Note that the USC-id must be entered without @usc.edu.


And here is how the connection information looks like after being connected to USC Secure wireless.


Read more ...

Moving remote Git repository

Jul 11, 2014
It is surprising that most of the search results related to moving Git repository is targeted towards moving repositories to github.com and alike. I was trying to move my git repository from, say, server1.edu to server2.edu. These servers are Linux servers and are accessible via SSH. However, using the common set of instructions i.e. git clone --bare followed by git push --mirror kept throwing me following error: $ git push -v --mirror ssh://server2.edu:/home/user/Repo.git Pushing to ssh://server2.edu:/home/user/Repo.git fatal: '/home/user/Repo.git' does not appear to be a git repository fatal: Could not read from remote repository. Please make sure you have the correct access rights and the repository exists. Some posts suggested to first initialize a git repository on server. This sounded odd to me as per my understanding, all we need is SSH access to the server in order to setup as a remote Git repository.

And it turns out that the answer is very simple and is actually explained on Git documentation. Just perform a local --bare clone of the repository then scp or rsync it to server and update origin of the repository. Thats it! All push/pull would work as expected after that with new server. Here are steps I followed (notice server1 and server2 in the commands): # Check current remotes $ cd /home/user/Repo $ git remote -v origin user@server1.edu:/home/user/Repo.git (fetch) origin user@server1.edu:/home/user/Repo.git (push) # Temporary --bare clone in /tmp $ cd /tmp $ git clone --bare file:///home/user/Repo Cloning into bare repository 'Repo.git'... remote: Counting objects: 4389, done. remote: Compressing objects: 100% (4349/4349), done. remote: Total 4389 (delta 3138), reused 3 (delta 0) Receiving objects: 100% (4389/4389), 45.46 MiB | 15.28 MiB/s, done. Resolving deltas: 100% (3138/3138), done. Checking connectivity... done. # Transfer the new bare repository to new server using scp or rsync $ scp -r Repo.git user@server2.edu:/home/user # Update origin url in local repository $ cd /home/user/Repo $ git remote set-url origin user@server2.edu:/home/user/Repo.git # Check the updated remotes $ git remote -v origin user@server2.edu:/home/user/Repo.git (fetch) origin user@server2.edu:/home/user/Repo.git (push) # Delete the temporary clone in /tmp $ rm -rf /tmp/Repo.git
Read more ...

LaTeX to word document

Jan 24, 2014
Tested on: Linux Mint 13 (Ubuntu 12.04), Microsoft Office 2010, LibreOffice 3

It is common to typeset scientific documents in  \(\LaTeX\). However, few people may like to still read and edit the document in word processors like Microsoft word (.doc or .docx)or LibreOffice (.odt). Here are quick (& dirty) steps to produce reasonably looking "office" documents from .tex files. The idea is to exploit HTML output as intermediate format which is readable by word processors. This ideas is shown below and has been explored and reported widely.
.tex.html.docx
  1. Convert \(\LaTeX\) to .html: There are various ways to achieve this, but htlatex from TeX4ht worked best for me. First install TeX4ht and then then run following on the \(\LaTeX\) document. Note that htlatex runs latex three times before calling TeX4ht programs and it would write out all the outputs in the same directory as the .tex file (see below for handling PDF images). The generated files would include one .html file (paper.html for command shown below). $ sudo apt-get install tex4ht $ htlatex paper.tex
  2. PDF images: If the .tex file uses PDF files as images, then htlatex (or latex) may not be able to go along with correct conversion. Some discussions on Stack Exchange were very help for this issue and provided the solution. First create a configuration file, say myxhtml.cfg, with following content: \Preamble{xhtml} \Configure{graphics*} {pdf} {\Needs{"convert \csname Gin@base\endcsname.pdf \csname Gin@base\endcsname.png"}% \Picture[pict]{\csname Gin@base\endcsname.png}% \special{t4ht+@File: \csname Gin@base\endcsname.png} } \begin{document} \EndPreamble Then run htlatex as shown below. Note that the .tex file should use correct extension for every included image (or else use \DeclareGraphicsExtensions{.pdf}). $ htlatex paper.tex myxhtml
  3. Fix HTML: Sometimes TeX4ht will not write out clean html files i.e. the html tags may not be aligned properly. This may prevent html to import into word processors. Online editors like Fix My Html and HTML Tidy Online did the trick for me. Use the .html file generated by htlatex as input to these online editors and save the fixed html file for next step.
  4. Import HTML in word processor: Usually most word processors would support importing HTML files. If that does not work (like in my case), you can just open the HTML file in a browser then copy-paste the whole page into the word processor (check if your word processor also supports Paste Special for formatted text. It everything works out then you should be able to just save the pasted document in .doc, .docx or .odt format. 
The above set of steps produced good looking single column document for me with correct bibiliography references. The math equations are embedded as images in the documents, which may not be optimal but the process works for reviewing and editing the text by someone who prefers word processors.
Read more ...

Parent directories in tar archives

Jan 3, 2014
Tested on: Linux Mint 13 Maya (based on Ubuntu 12.04 LTS)

It is common to see full directory tree or . (dot) in tar archives. Sometimes, it may be unnecessary hassle to remove all parent directories after extracting or to look for the extracted file which merged with other files in extracted directory. In some situations, it may be desirable to create a tar archive with top directory (with informative name). There has been many discussion about the same. Here is quick summary with an example for future reference.

Test setup

We will create a test directory with some files in it with following commands (outputs are also shown): $ mkdir -p /tmp/path/to/test/dir_archive $ touch /tmp/path/to/test/dir_archive/file{1..10} $ ls /tmp/path/to/test/dir_archive/ file1 file10 file2 file3 file4 file5 file6 file7 file8 file9 $ tar --version tar (GNU tar) 1.26 Copyright (C) 2011 Free Software Foundation, Inc. License GPLv3+: GNU GPL version 3 or later . This is free software: you are free to change and redistribute it. There is NO WARRANTY, to the extent permitted by law. Written by John Gilmore and Jay Fenlason.

Full parent directory

Following command creates tar archive with full parent directory structure as shown by --list command. $ tar -caf /tmp/test.tar.gz /tmp/path/to/test/dir_archive $ tar --list -af /tmp/test.tar.gz tmp/path/to/test/dir_archive/ tmp/path/to/test/dir_archive/file3 tmp/path/to/test/dir_archive/file10 tmp/path/to/test/dir_archive/file1 tmp/path/to/test/dir_archive/file8 tmp/path/to/test/dir_archive/file4 tmp/path/to/test/dir_archive/file2 tmp/path/to/test/dir_archive/file7 tmp/path/to/test/dir_archive/file5 tmp/path/to/test/dir_archive/file6 tmp/path/to/test/dir_archive/file9

Dot (.) as parent directory

Following command creates tar archive with dot (.) as parent directory. Note that the tar command ends in a dot (.). $ tar --directory /tmp/path/to/test/dir_archive -caf /tmp/test.tar.gz . $ tar --list -af /tmp/test.tar.gz ./ ./file3 ./file10 ./file1 ./file8 ./file4 ./file2 ./file7 ./file5 ./file6 ./file9

Directory name as parent directory

The trick to get dir_archive as parent directory in tar archive is to use --directory to change directory to one level up as shown below. Note location of dir_archive in the command. $ tar --directory /tmp/path/to/test -caf /tmp/test.tar.gz dir_archive $ tar --list -af /tmp/test.tar.gz dir_archive/ dir_archive/file3 dir_archive/file10 dir_archive/file1 dir_archive/file8 dir_archive/file4 dir_archive/file2 dir_archive/file7 dir_archive/file5 dir_archive/file6 dir_archive/file9
Some more notes about tar command:
  • Above commands can be combined with used along with exclude directive to by using --exclude='dir_archive/dir_exclude' after the --directory option.
  • Do not mix absolute and relative path in tar command for pathname and exclude option. --directory is an exception and can be absolute path while others paths can be defined relative to it.
Read more ...

Useful LaTeX tricks

Aug 3, 2013

\(\LaTeX\) word count

It can get difficult to keep track of accurate number of words in a \(\LaTeX\) document. TeXcount is a script for counting words in text and math equations in LaTeX documents. It can also generate very detailed html output with color-coded words types. TeXcount is part of Tex live and can be installed by installing texlive-extra-utils from Ubuntu repository. TeXcount also has a web interface. $ texcount document.tex FILE: document.tex Words in text: 6462 Words in headers: 48 Words in float captions: 274 Number of headers: 19 Number of floats: 4 Number of math inlines: 204 Number of math displayed: 8 texcount -v -html document.tex > word_count.html

\(\LaTeX\) diff

Usual diff programs may not do a great job of diffing two \(\LaTeX\) documents. Following are some of the alternative ways:
  • Use wdiff with colordiff, similar to this stackexchange question: wdiff -n old.tex new.tex | colordiff | less -R
  • Use latexdiff to determine differences and create a new LaTeX document with markup differences between two latex files. latexdiff can be found in Ubuntu repository and detailed description of usage can be found here. An example with beautifully typeset document is given below. latexdiff draft.tex revision.tex > diff.tex
  • Another alternative could be to follow a simple guideline: Always start a new sentence in a new line and do not put any line-breaks in till the sentence ends. This allows traditional diff/merge programs like meld etc to work in a much better way.

\(\LaTeX\) and git

It is useful to use a version control system, like git, with \(\LaTeX\) documents. Here are some useful tips while working with git:
  • Check git + LaTeX workflow for some great tips.
  • Use latexdiff (also see above) in smarter way:
    • latexdiff <(git show checksumHash:file.tex) file.tex > diff.tex
    • Git-latexdiff can also be used for more advanced operations, like documents involving multiple .texfiles.
    • Check stackexchange discussion for more solutions.

\(\LaTeX\) on blogspot.com

MathJax is awesome. It is very easy to install and get \(\LaTeX\) equations working. \[ J_\alpha(x) = \sum\limits_{m=0}^\infty \frac{(-1)^m}{m! \, \Gamma(m + \alpha + 1)}{\left({\frac{x}{2}}\right)}^{2 m + \alpha} \]
Read more ...

Git cheat sheet

Jul 10, 2013

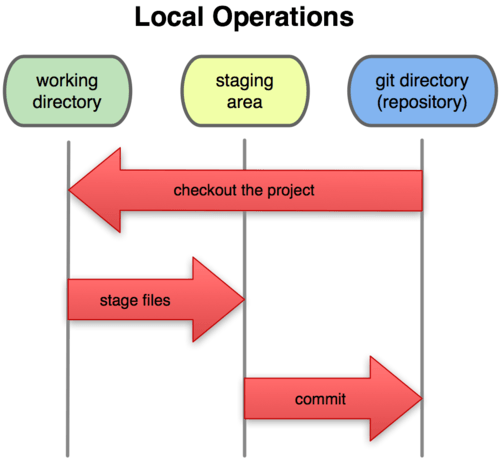
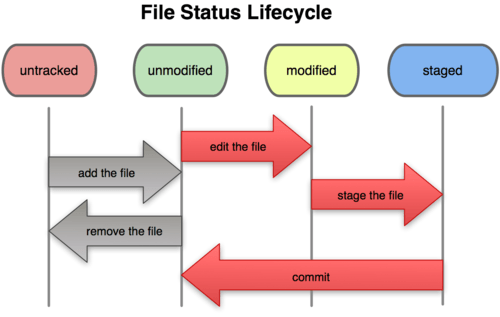
Git overview: Operation and File lifecycle

Image are hotlinked from Pro Git book, written by Scott Chacon.


Some of the commands listed here may use alias and/or configuration defined in ~/.gitconfig (see near the end of the post).

General operations

  • Help with git: git --help # List available git commands git help <command> # More details about a specific command git <command> --help # More details about a specific command
  • Display status of (local) repository: git status git st # Abbreviated using ~/.gitconfig git status -sb # Shorter output git status -uno # Hide details of untracked files
  • Adding files to staging area: git add --dry-run <file1> <file2...fileN> # Dry run. No change in repository git add -n <file1> <file2...fileN> # Abbreviated flag for dry run git add <file1> <file2...fileN> # Add files to staging area git add *.m *.txt # Also supports wildcards
  • Commit changes with message: git commit -m 'message' # Commit ONLY staged files git commit -a -m 'message' # Commit ALL changes, including unstaged files git ci 'message' # Abbreviated using ~/.gitconfig

Compare and inspect

  • Changes in working directory: git diff --color # Colored diff git diff --stat # Show diffstat git diff --ignore-all-space # Ignore all whitespace git diff -w # Abbreviated --ignore-all-space git diff --ignore-space-changes # Ignore change in amount of whitespace git diff -b # Abbreviated --ignore-space-changes git diff -w --color-words # Colored word diff (rather than line diff) ignoring whitespace git diff --cached # Show changes in staged files git diff --staged # Same as --cached
  • Inspect changes:
    (gitk is a tcl/tk based gui; Beginner tutorial) gitk --all # Browse all branches in local repository git log --oneline --graph # Inspect repository with summary of changes git log --oneline --graph --stat # Inspect repository with diffstats git whatchanged --oneline --graph # Similar to git log git lg # Abbreviated using ~/.gitconfig git show <commit> # Shows details of changes in commit
  • Inspect changes beyond file renames:
    (Take care with renames: NEVER commit renames and modifications in the same commit. Check these as well.) git log --oneline --follow <filename> # Summary of changes git log --follow -p <filename> # Detailed changes gitk <filename> # Detailed changes using gitk

Branching

  • Pro Git book has an excellent chapter on Branching and Merging.
  • When typing in the name of a branch in following commands, try using TAB for auto-completion. It works most of the times.
  • git branch # List local branches git branch -a # List all local and remote branches git checkout <branch_name> # Switch to other existing branch git checkout -b <branch_name> # Create a branch and switch to it git branch -d <branch name> # Delete a branch
  • Compare branches: (order of branches matter) git diff <branch1>..<branch2> git diff --stat <branch1>..<branch2> # Generate diffstat git diff --name-status <branch1>..<branch2> # Short diff with only name and status git diff <branch1> <branch2> <filename> # Show differences only for a file git difftool <branch1> <branch2> <filename> # Use (external) diff tool
  • Compare directories (branches/commits): (requires git version >=1.7.10) git difftool --dir-diff <commit1>..<commit2> git difftool --dir-diff <commit1> git difftool --dir-diff <branch1> git difftool --dir-diff <branch1>..<branch2>
  • Remote branches & its management
    A very good and detailed description of remote branch management can be found in Pro Git book. # Pushing to remote git push origin localBranch # Pushes localBranch to origin git push -u origin localBranch # Pushes/sets association of localBranch to origin git push origin localBranch:remoteBranchName # Pushes localBranch to origin/remoteBranchName git push -u origin localBranch:remoteBranchName # Similar effect to -u above # Tracking or defining association. Also see this. git branch -u origin/remoteBranchName # Associates current branch to origin/remoteBranchName git branch -u origin/remoteBranchName localBranch # Associates localBranch to origin/remoteBranchName # Checking out from remote git fetch origin && git checkout remoteBranchName # Checkout origin/remoteBranchName git checkout -b localBranch origin/remoteBranchName # Checkout origin/remoteBranchName to localBranch git pull # Works after checking out or associating. # Deleting remote branch git push origin :remoteBranchName # Deletes origin/remoteBranchName git push origin --delete remoteBranchName # Deletes origin/remoteBranchName # Prune stale branch. See git remote branch deleted but still appears in 'branch -a' git remote prune origin # Removes all stale branches git fetch -p # Fetches from origin and prunes all stale branches # Show details of branch tracking information git remote -v show origin git branch -vv -a

Merge conflicts

Good read about three-way merge in git: Painless Merge... and Three way git... Here is a summary:
  • Use git mergetool with meld. See ~/.gitconfig below. Mergetool would go through the conflicting files and create various new files with different file extensions so that it can use following command with meld (see git source code for more details). meld --output $MERGED $LOCAL $BASE $REMOTE
  • $LOCAL: Contents of the file on the current branch. This is presented in Left-most column in meld.
  • $REMOTE: Contents of the file to be merged. Right-most column in meld.
  • $BASE: Common base of the merge OR half-finished merge where things started to fail. It is shown in middle column in meld. This is column which you would want to edit.
  • $MERGED: File to which meld would write the merge resolution. It is not shown in meld. However, when $BASE is saved after editing, the output is written to $MERGED. Usually, $MERGED does not have any special extension like above files.
  • Mergetool creates *.orig backup files while resolving merges. These are safe to remove once a file has been merged.

Tagging

  • Create/Delete tags (Also see Pro Git book) git tag -a v1.4 -m 'my version 1.4' # Creates annotated tag to current commit git tag -a v1.4 -m 'my version 1.4 <checksum> # Adds tag to an older commit git tag -d <tag_name> # Deletes a tag
  • List tags git tag -l # Lists tags in alphabetical order git tag # Lists tags in alphabetical order git tag -l -n1 # Lists tags along with annotation git tag -l <pattern> # Lists tags in matching a pattern git tag -l v13* # Lists tags starting with v13 git log --tags --simplify-by-decoration --pretty="%d" # Lists tags in chronological order git tl # Abbreviated by ~/.gitconfig git show <tag_name> # Show details of a tags
  • Remote tags git ls-remote --tags origin # List all tags on origin git push origin <tag_name> # Push a tag to origin git push origin --tags # Push all tags to origin git push origin :refs/tags/<tag_name> # Delete a tag on origin

Others:

  • Revert changes (excellent examples in git-reset documentation) git reset # Undo all add. Retains all changes in working tree git reset --hard # Undo add all. Discards all changes in working tree git reset HEAD <file_name> # Undo add one file. Retains all changes in working tree git reset --soft HEAD^ # Undo last commit. Retains all changes in working tree uncommitted (un-stage) all changes including files and folders:


~/.gitconfig

git difftool falls back to git mergetool config variables when the difftool equivalents have not been defined. If a merge resolution program is not specified, git mergetool will use the configuration variable merge.tool. [core] editor = emacs autocrlf = input [merge] tool = meld [alias] ci = commit -a -m st = status -sb rb = rebase lg = log --graph --all --format=format:'%C(auto)%h (%cd)%C(reset)%C(bold red)%d%C(reset) %C(bold green)%s%C(reset) %C(bold white)- %cn%C(reset)' --abbrev-commit --date=short df = diff -w --color-words dft = difftool -y tl = log --tags --simplify-by-decoration --format=format:'%C(auto)%h (%cd) -%C(reset)%C(bold red)%d%C(reset) %C(bold white)- %cn%C(reset)' --date=short --author-date-order [color] ui = true [color "status"] added = yellow changed = red untracked = cyan [push] default = current

Other great Git references:
Read more ...

gs (GhostScript) cheat sheet

Aug 28, 2012
Cheat-sheet for versatile interpreter GhostScript. It can be used to tweak, convert, produce high quality Postscript and PDF files.

Convert postscript (ps) to pdf:

gs -q -dBATCH -dNOPAUSE -sDEVICE=pdfwrite -sOutputFile=fileout.pdf filein.ps

Merge ps and/or pdf:

gs -q -dBATCH -dNOPAUSE -sDEVICE=pdfwrite -sOutputFile=fileout.pdf filein1.ps filein2.pdf filein3.pdf

Extract page(s) from a ps or a pdf document:

gs -q -dBATCH -dNOPAUSE -sDEVICE=pdfwrite -dFirstPage=3 -dLastPage=3 -sOutputFile=fileout.pdf filein.ps

Embed fonts in a pdf:

gs -q -dBATCH -dNOPAUSE -sDEVICE=pdfwrite -sOutputFile=fileout.pdf -dPDFSETTINGS=/prepress -dEmbedAllFonts=true -dSubsetFonts=true -dCompatibilityLevel=1.6 filein.pdf

Convert images to pdf:

Check this post. Or else use ImageMagic's convert.

PDF optimization options

-dPDFSETTINGS=/screen (screen-view-only quality, 72 dpi images) -dPDFSETTINGS=/ebook (low quality, 150 dpi images) -dPDFSETTINGS=/printer (high quality, 300 dpi images) -dPDFSETTINGS=/prepress (high quality, color preserving, 300 dpi imgs) -dPDFSETTINGS=/default (almost identical to /screen)

Paper size options

-sPAPERSIZE=letter -sPAPERSIZE=a4 -dDEVICEWIDTHPOINTS=w -dDEVICEHEIGHTPOINTS=h (point=1/72 of an inch) -dFIXEDMEDIA (force paper size over the PostScript defined size) -gWIDTHxHEIGHT (page size in pixels)

Output devices:

-sDEVICE=pdfwrite -sDEVICE=ps2write -sDEVICE=png16m (24-bit RGB color) -sDEVICE=pnggray (grayscale) -sDEVICE=pngmono (black-and-white) -sDEVICE=pngalpha (32-bit RGBA color) -sDEVICE=jpeg (color JPEG) -sDEVICE=jpeggray (grayscale JPEG) -sDEVICE=epswrite (encapsulated postscript) -sDEVICE=txtwrite (text output, UTF-8) Check -sOutputFile below, for separate images for each page of a multi-page document. Tiff, PNM and many more formats are supported. Check details in Ghostscript output devices.

Help & list of available devices:

gs -h

Other options

-dNOPAUSE (no pause after page) -dBATCH (exit after last file) -sOutputFile=ABC-%03d.pgm (produces 'ABC-001.pgm'..'ABC-010.pgm'..) -dEmbedAllFonts=true -dSubsetFonts=true (Embeds only the characters used in document) -dCompatibilityLevel=1.4 (Adobe's PDF specifications, >=1.4 for font embedding, =1.6 for OpenType font embedding) -dCompressPages=true (compress page content) -dFirstPage=pagenumber -dLastPage=pagenumber -dAutoRotatePages=/PageByPage (or /All or /None) -rXRESxYRES (XRES & YRES in pixels/inch) -rRES (same XRES & YRES, affects images and fonts converted to bitmaps) -sPDFPassword=password More details & defaults on ps2pdf documentation.
Adobe® PDF Creation Settings - Used by GhostScript.
GhostScript Documentation.

Read more ...

Where did my disk space go?

May 11, 2012
Have you ever noticed missing disk space on newly bought hard disks? Here are some possible reasons:
  1. Unit confusion: The most common confusion in between GB/GiB or MB/MiB.
  2. Reserved space in linux partitions.
  3. Filesystem overheads.

Unit Confusion

Many people have questions like: Why my 1 TB hard disk shows only 930 GB? This is purely a confusion of units and bases used when words like 'kilo', 'mega' etc. are used. Following table, from AskUbuntu, explains the situation. Prefix Bytes Prefix Bytes 1 Byte = (2^10)^0 = 1 1 Byte = (10^3)^0 = 1 1 Kibibyte(KiB) = (2^10)^1 = 1024 1 Kilobyte(KB) = (10^3)^1 = 1000 1 Mebibyte(MiB) = (2^10)^2 = 1048576 1 Megabyte(MB) = (10^3)^2 = 1000000 1 Gibibyte(GiB) = (2^10)^3 = 1073741824 1 Gigabyte(GB) = (10^3)^3 = 1000000000 1 Tebibyte(TiB) = (2^10)^4 = 1099511627776 1 Terabyte(TB) = (10^3)^4 = 1000000000000 Many softwares and operating systems often calculate size in GiB and put GB when they are displaying it. This becomes even worse because most of the harddisks are labelled with actual GBs and hence when numbers are reported in GiB, it creates the confusion. Online calculators like this can help to remove the confusion. NIST states very interesting historical reason of this confusing prefix:

Once upon a time, computer professionals noticed that 210 was very nearly equal to 1000 and started using the SI prefix "kilo" to mean 1024. That worked well enough for a decade or two because everybody who talked kilobytes knew that the term implied 1024 bytes. But, almost overnight a much more numerous "everybody" bought computers, and the trade computer professionals needed to talk to physicists and engineers and even to ordinary people, most of whom know that a kilometer is 1000 meters and a kilogram is 1000 grams.
Then data storage for gigabytes, and even terabytes, became practical, and the storage devices were not constructed on binary trees, which meant that, for many practical purposes, binary arithmetic was less convenient than decimal arithmetic. The result is that today "everybody" does not "know" what a megabyte is. When discussing computer memory, most manufacturers use megabyte to mean 220 = 1 048 576 bytes, but the manufacturers of computer storage devices usually use the term to mean 1 000 000 bytes. Some designers of local area networks have used megabit per second to mean 1 048 576 bit/s, but all telecommunications engineers use it to mean 106 bit/s. And if two definitions of the megabyte are not enough, a third megabyte of 1 024 000 bytes is the megabyte used to format the familiar 90 mm (3 1/2 inch), "1.44 MB" diskette. The confusion is real, as is the potential for incompatibility in standards and in implemented systems.

Reserved space

While formatting Linux partitions like ext2/ext3/ext4, 5% of the drive's total space is reserved for the super-user (root) so that the operating system can still write to the disk even if it is full. This space is wasted if the drive is being used solely for data storage especially on large partitions. The details of the reserved space can be seen by running following command (replace sda1 by your drive name)sudo tune2fs -l /dev/sda1 The reserved space can be decreased to 1% of the drive's total space by running following command. To completely remove this reserved space replace 1 by 0. sudo tune2fs -m 1 /dev/sda1 As explained in Ubuntu Documentation, using this command does not change any existing data on the drive. You can use it on a drive which already contains data. This should be left to 5% on drives containing filesystem /, /var, /tmp in order to avoid any problems.

Filesystem overheads

Journaling file systems like ext2/ext3/ext4/NTFS used file tables for managing the filesystem. These tables take up lots of space (2-3% of drive size). Different file system allocates space to these tables differently. For example ext4 allocates all its space during the format itself, which shows up as used disk space. Where as NTFS allocates it when more files are written to disk.

The exact details are more complicated than this handy wavy explanation. Many forum posts has discussed this issue.

Read more ...

Wireless power management in Ubuntu

Feb 15, 2012
Tested on: Ubuntu 11.04 (natty)

I have been experiencing extremely slow network connection whenever my laptop has been on battery. Speedtest results showed a 50 fold speed reduction when my laptop was on battery. I speculated that lower speed has to do with power-management, which reduces network speed in order to save battery. Ubuntu, like other operating systems, also has power management options installed by default. There is a frontend/GUI for Power Management preferences. But I could not find any thing related to wireless or Wi-Fi in the GUI. Looking around on internet, I found many pages. Here is a log of the things I found.
  • Confirming the behaviour: In order to make sure that power-management is the culprit of the slow network access run following command both when on power and when on battery.iwconfig The output should look like following: wlan0 IEEE 802.11bgn ESSID:"USC Wireless" Mode:Managed Frequency:2.462 GHz Access Point: 00:00:00:00:00:00 Bit Rate=65 Mb/s Tx-Power=15 dBm Retry long limit:7 RTS thr:off Fragment thr:off Power Management:on Link Quality=68/70 Signal level=-42 dBm Rx invalid nwid:0 Rx invalid crypt:0 Rx invalid frag:0 Tx excessive retries:27329 Invalid misc:204 Missed beacon:0 Notice line five of the output. If it says anything other than Power Management:off while on battery, then it could be power management which is slowing down then network. Check power argument in iwconfig man page for other possible options.

  • Temporarily disable the power-management: While on battery, run following command (replace wlan0 with your Ethernet name) sudo iwconfig wlan0 power off This will only affect the wireless settings of power management. and should change the output of previous command to Power Management:off and most-likely revert the network speed to usual speed. However, on restarting the system the power management will be enabled.

  • Permanently disable power-management for wireless: If you do not want to keep running the above command each time you restart you laptop, create a file /etc/pm/power.d/wireless with following content: #!/bin/sh /sbin/iwconfig wlan0 power off Make the file executable by running following command:sudo chmod +x /etc/pm/power.d/wireless This new file will override the default wireless script run by power management and will also make sure that wireless power management is turned off. The above trick is taken from Ubuntu Documentation (Check few lines before the example). It says:

    When you run pm-powersave it combines the scripts in these two directories and executes them in sorted order. If both directories contain a script with the same name, the one in /etc/pm/power.d/ has a higher precedence and only this one will be executed. Therefore to disable a script from /usr/lib/pm-utils/power.d/ simply create an empty file in /etc/pm/power.d/ with the same name and without the execute bit set.


Read more ...

vsftpd behind router/firewall

Jan 28, 2012
Tested on: Ubuntu 11.04 (natty)

This is how I got vsftpd server work behind a router. If you are getting errors like "Server sent passive reply with unroutable address. Using server address instead." or "500 illegal port command" on list (ls) command, this post might help. Setting passive mode configuration correctly is the trick.

Please note that this may not be the perfect solution or even worse - not very secure. Read vsftpd.conf manual before applying any changes.

Make sure port 20, 21 and few more ports, for example 4242-4252, are being forwarded to the server. We will need these extra ports for passive mode - set pasv_min_port and pasv_max_port accordingly in the configuration file. Add following to /etc/vsftpd.conf . connect_from_port_20=YES pasv_enable=YES pasv_addr_resolve=YES pasv_address=myaddress.dyndns.com pasv_min_port=4242 pasv_max_port=4252 Set pasv_address to your domain name. You can use dyndns for dynamic ip-address. vsftpd will convert your domain name to ip address when vsftpd server starts. Note that if your ip address changes after vsftpd has started it will not update the ip-address. There has been some attempt to the solve it.
Here are some more configurations with comments: # Only allow FTP access to users listed in file /etc/vsftpd.userlist # Other users will not have ftp access userlist_enable=YES userlist_deny=NO userlist_file=/etc/vsftpd.userlist # Disable delete commands cmds_denied=DELE,RMD # Verbose logging log_ftp_protocol=YES # You may restrict local users to their home directories. See FAQ for # the possible risks in this before using chroot_local_user chroot_local_user=YES
For more security, you can also modify the login-shell of a dummy ftp user to something like /bin/false - which does not exist. Use following command sudo usermod -s /bin/false <username> In order to make this work you have to add /bin/false to the file /etc/shells. Or else vsftpd will generate login error when the user logs in using ftp.
Read more ...

xpdf & X resource

Aug 7, 2011
Tested on: Ubuntu 11.04

xpdf man page is not very detailed in terms of possible values for X resource file. Following are the places where xpdf settings can be specified:
  • Ubuntu X resource file: ~/.Xresources The exact files being read can be found by looking into /etc/gdm/Xsession. My settings in ~/.Xresources # xpdf settings xpdf.geometry: 1280x1024 xpdf.initialZoom: width Run following for immediate effect: xrdb -nocpp -merge ~/.Xresources
  • xpdfrc can be found at ~/.xpdfrc and at /etc/xpdf/xpdfrc. My ~/.xpdfrc file: include /etc/xpdf/xpdfrc initialZoom width
Read more ...

TeamViewer: Unattended auto-start in Ubuntu

Aug 4, 2011
Tested on: Ubuntu 11.04 (Natty Narwhal)

This is log of the steps to setup TeamViewer on Ubuntu on my laptop, so that I can access my laptop from any other computer, without any user interaction on my laptop's end. More importantly, TeamViewer should be started on each reboot automatically & should not interfere with user normal task(s).

Precisely its an effort to mimic TeamViewer on windows, where it can be used to remotely access the computer even before login to windows (Though this workaround is cheating as we use auto-login feature of Ubuntu. Read step 3 for details). Following are the main steps:
  1. Install & setup TeamViewer for auto-start - Detailed steps are here.
    • Download & install appropriate .deb file.
    • Add a new application in Menu -> System -> Preferences -> Startup Applications.
  2. (Optional) Some configuration to make sure that TeamViewer does not pop-up on user logins.
  3. Configure Ubuntu to automatically login & then lock the screen
Details of last two steps are given below.
Step 2:
This is optional step. Its safe to skip this step. If TeamViewer is added to auto-start on each login, the user gets the TeamViewer window on each login. This might be annoying after some time. So, the idea here is to use another application, devilspie, to hide TeamViewer window: put the TeamViewer window on another workspace and/or minimize it. Here is a very good devilspie tutorial.
  • Install devilspie (& maybe gDevilspie, a nice front-end)
  • Create devilspie directory mkdir ~/.devilspie
  • Create a file with name 'teamviwer.ds' & put following in it. ; generated_rule teamviewer ( if ( begin ( is ( application_name ) "TeamViewer" ) ( is ( window_name ) "TeamViewer" ) ) ( begin ( set_workspace 2 ) ( minimize ) ( println "match" ) ) ) It will put the windows with name "TeamViewer" on workspace 2 & minimize it. Make sure devilspie demon is running. Check gDevilspie GUI.

This is not a very elegant solution. There were some minor issues with the rendering of the TeamViewer window (Though it works without any flaw). There can be some other ways to put it in system tray using some application like alltray. But this workaround is good enough for me.

Step 3: Configure Ubuntu to automatically login & then lock the screen
TeamViewer will auto-start only when user is logged in. So in order to make sure that TeamViewer is started even in case of remote reboot, auto-login has to be enabled. But this is also a security/privacy threat. One of the easiest way to maintain security is to somehow lock the screen immediately after login in. We can create a custom xsession for the same. See note 2 below, if you are using some secured wireless network on Ubuntu.

Create a file /usr/share/xsessions/autolock.desktop with following content. Change username to the correct user name. [Desktop Entry] Name=Auto Lock Gnome Comment=Custom ~/.xsession script Exec=/home/<username>/.xsession X-Ubuntu-Gettext-Domain=gdm
Create another file ~/.xsession with following content: #! /bin/bash gnome-screensaver gnome-screensaver-command --lock gnome-session --session=2d-gnome Note the last line. I am loading the Ubuntu (Wihout any effects). You may want to change it to appropriate session. Check other .desktop files in /usr/share/xsessions/ for the correct command.

Now enable auto-login. Menu-> System -> Administration -> Login Screen. Select "Auto Lock Gnome" in the default session. Reboot & you should see the change. Check note 1 & 3 as well.

Notes:
  1. You may opt to allow only selected computers to connect to the TeamViewer for better security. See 10.2 "Security Category" in TeamViewer manual
  2. If auto-login is enabled, Gnome-Keyring kicks in each time after auto-login & usually affects all application related to saved passwords including network-manager. This is especially important if you are using a secured network, like WEP etc, as the internet connection won't be active till user enters the password in Gnome-Keyring manually. Here is a very easy work-around to get internet connection without Keyring kicking in. You should apply this changes for only the trusted network(s).
  3. Please note that enabling Auto-login & configuring it to connect to wireless network automatically is a potential security threat. Try it at your own risk.
Read more ...

CVS cheatsheet

Jul 15, 2011
Tested on: CentOS release 5.6 (Final)

There are many other CVS cheatsheets & books on the web. This is my version, which is intended to grow with time but will be less verbose (might not be good for beginners).
  • Update current working directory with prune & build directories cvs update -P -d
  • Difference between current version & latest repository version: cvs diff -cw <fileName>
  • Rename a file: mv <OldFileName> <NewFileName> cvs remove <OldFileName> cvs add <NewFileName> cvs commit -m "Renamed <OldFileName> to <NewFileName>" <OldFileName> <NewFileName>
Read more ...

Infrequent Linux commands

Jul 15, 2011
Tested with mainly Ubuntu-based distributions. List of Linux commands which are useful but not frequently used. See online or local man pages for details.

System Information

uname -a # Details of kernel, processor, machine, OS cat /proc/version # Detailed kernel version. More details about /proc. cat /etc/*-release # See details of distribution lsb_release -a # See details of distribution service --status-all # status of init services; [+] Running, [-] Not running, [?] Unknown sudo initctl list # List & status of upstart jobs. More at UbuntuBootupHowto.

Hardware Information

cat /proc/cpuinfo # Shows CPU details free -mt # Shows details of memory usage sudo dmidecode -t memory # Shows details of RAM slots df -hT # Report disk type, space usage, mount points sudo fdisk -l # Lists partition table of all disks blkid # Lists UUID and type of all disks ls -l /dev/disk/by-uuid # Lists drives by UUID

Users and Groups

groups <username> # Lists group memberships of the user id -u <username> # Prints user-id of user id -g <username> # Prints group-id of user id <username> # Print user and group information of user sudo passwd <username> # Change user password sudo usermod -d /new/home/dir <username> # Change user home directory
  • Disk usage (size) of directories: du -ach du -sch du -ch /home/user
  • List USB Devices lsusb -t
  • apt installed packages:less /var/log/apt/history.log zless /var/log/apt/history.log.1.gz dpkg --get-selections | sed -n 's/\t\+install$//p' Automatically installed packages </var/lib/apt/extended_states awk -v RS= '/\nAuto-Installed: *1/{print$2}'
  • Image to pdf:convert *.png out.pdf convert -compress jpeg *.png out.pdf

Last edited: June 11, 2014

Read more ...

Font & old emacs

Jul 11, 2011
Tested on: CentOS release 5.6 (Final)

The newer version of emacs (23.x) has a nice option in menu to change the default font. But the older emacs (21.4.1) does not have these options. The older (& stable) versions of emacs are generally shipped with centos. Here are steps for changing the default fonts in emacs 21.4.1

Option 1 (for current sessions only)
  1. Open emacs.
  2. Left-click on mouse while holding 'Shift' key on keyboard. A Font-menu will pop-up.
  3. Play around with the menu & set required font.

Option 2 (for all future sessions)
We have to find the available system fonts and apply them to ~/.emacs file.
  1. Open terminal & execute following command: xfontsel
  2. Left-click on 'fmly' & others to select a value. You will be able to see how the font looks like in the same window. When you are satisfied with the font selected press 'Select' button. It will copy the font name with details to clipboard. Following are some of the examples of the fonts: -*-courier-medium-r-*-*-17-*-*-*-*-*-iso8859-* -*-lucidatypewriter-medium-*-*-*-14-*-*-*-*-90-iso8859-* -*-luxi mono-medium-r-*-*-17-*-*-*-*-*-ascii-*
  3. Open ~/.emacs file in any text editor and add following at the end of the file: (set-default-font "-*-*-*-*-*-*-*-*-*-*-*-*-*-*") Replace -*-*-*-*-*-*-*-*-*-*-*-*-*-* by your selected font name (like one of the examples shown above) Save ~/.emacs & re-launch emacs. You should be able to see the difference.
  4. There might be some delay before text is displayed in emacs. Add following to top of the ~/.emacs file for a workaround: (modify-frame-parameters nil '((wait-for-wm . nil)))
Read more ...